Homemade Gluten-Free Bagels
This post may contain affiliate links. Please read our disclosure policy.
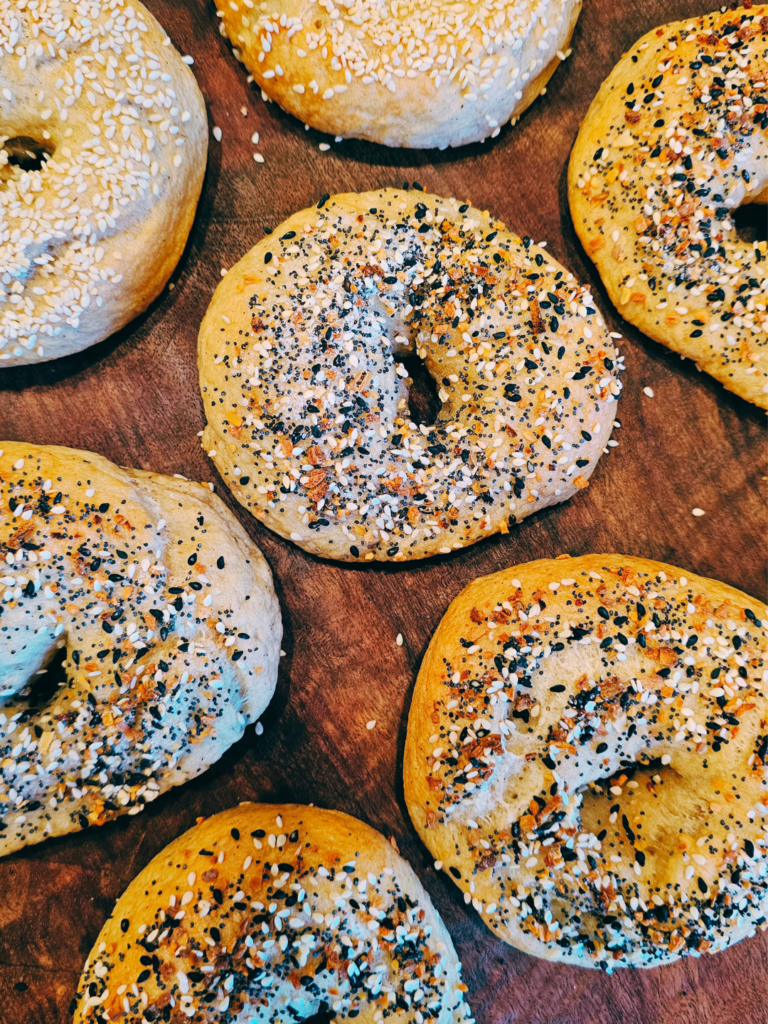
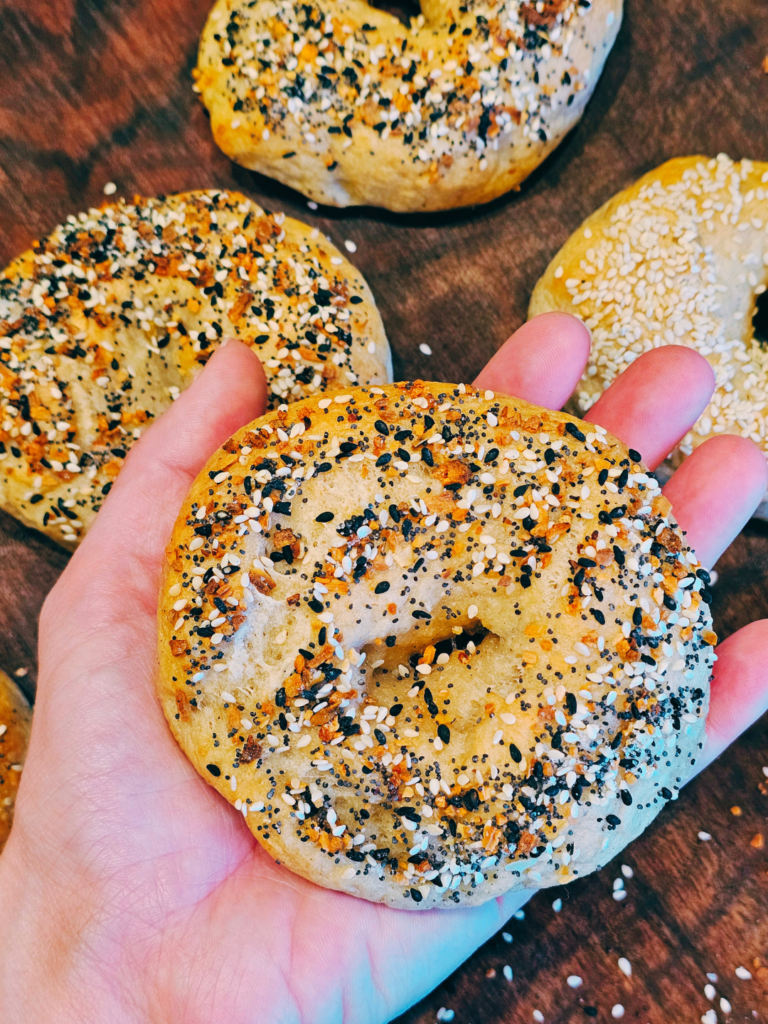
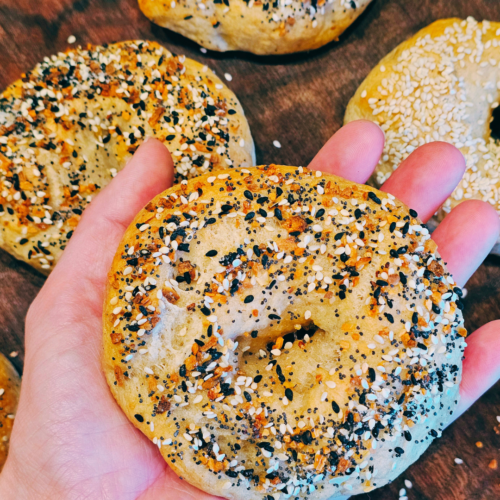
If you’ve been missing large, chewy bakery-style bagels on a gluten-free and dairy-free diet, these Homemade Gluten-Free Bagels are about to change everything. They have a soft yet chewy inside and a slightly crisp, but thin crust on the outside. Even better, they’re about 5 inches across making these perfect for the classic bagel sandwiches. These bagels only take about an hour and 45 minutes from start to finish and you get warm, fresh bagels that taste like they came from a bakery. The appearance, texture and flavor are all perfect that you really can’t tell they’re gluten-free, dairy-free, and egg-free(optional)!
I’ve made so many batches of bagels over the years trying to create the BEST recipe and it was 100% worth it because this final version is absolutely PERFECT. These homemade gluten-free bagels are simple enough for everyday baking, but special enough to feel like a treat.
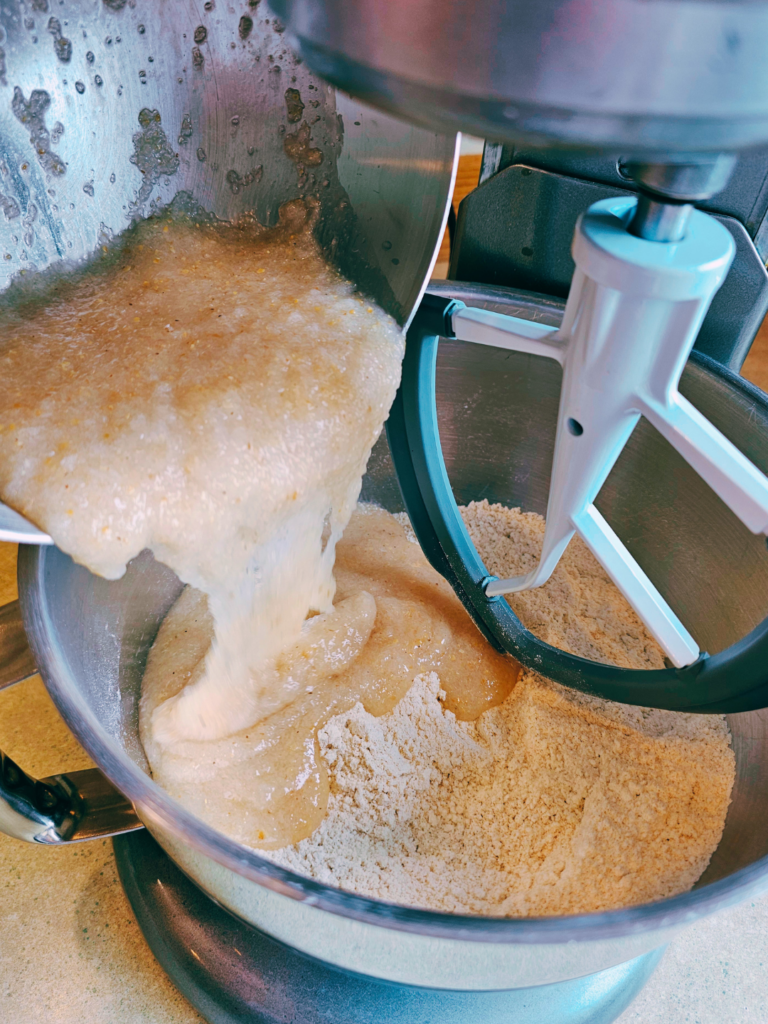
The dough mixes up quickly and easily, whether by hand or with a stand mixer, and it’s firm yet flexible enough to shape into bagels without your hands covered in sticky dough. Plus, these take less than two hours to whip up and eat!
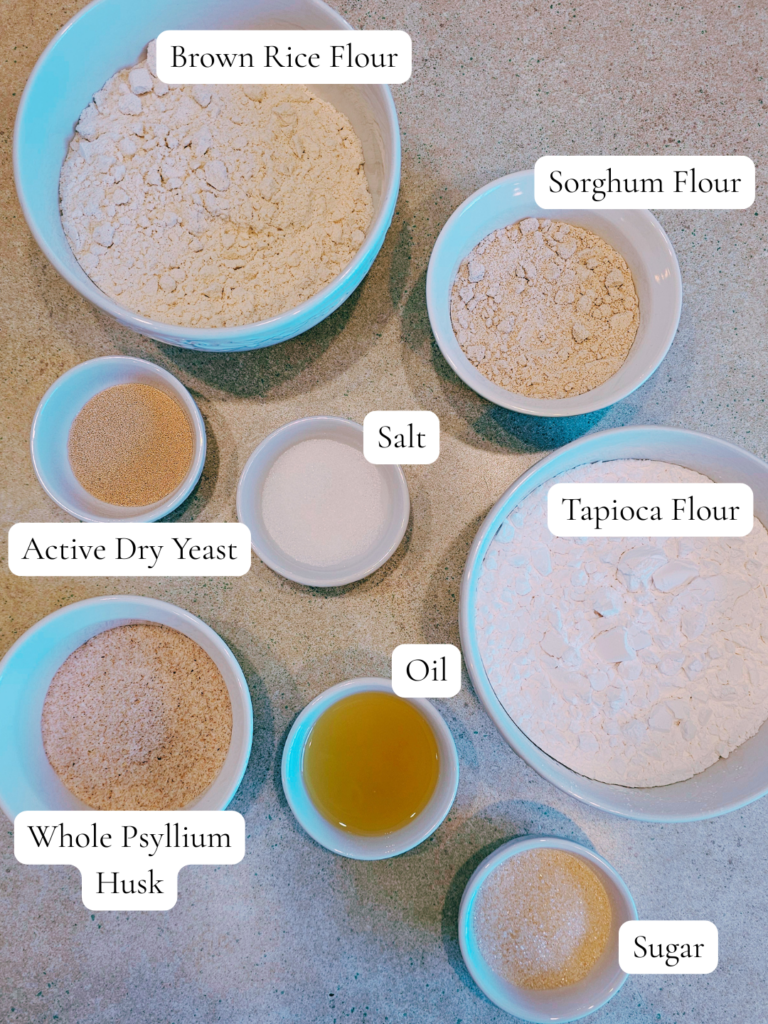
Ingredients You’ll Need:
Here are the ingredients you’ll need to make this recipe, plus a little about the substitutions you can use to get a perfectly round, chewy, browned bagel:
Plus, you’ll want this Homemade Everything Bagel Seasoning recipe to top the best bagels of your gluten-free life, trust me!
Possible Substitutions
This bagel recipe has simple ingredients that can be found in grocery stores or online, but a few substitutions can sometimes help. However, keep in mind substitutions can change the final outcome from the original recipe slightly.
Sorghum flour: You can substitute oat flour or teff flour instead, as long as you don’t have an oat allergy.
Tapioca starch: You can substitute potato starch or arrowroot starch instead.
Brown Rice Flour: You can substitute millet flour instead.
Whole Psyllium Husk: This is an important ingredient and should NOT be substituted. It’s like magic in gluten-free baking and helps bind everything together. However, if you have to use psyllium husk powder, use only 85% of the amount listed in a recipe.
Egg wash: This is an optional step that I skip most of the time, either way the bagels will still be golden brown and delicious (for reference, the pictures in this post are without egg wash). However, without the egg wash they won’t expand as much during baking. It doesn’t make a huge difference to me and sometimes I just want to save a few minutes and skip the hassle. If I don’t do the egg wash, I just sprinkle or roll the bagels in the toppings right after boiling while they’re on the baking sheet.
Shaping the Bagels
There are two main shaping methods you can use to shape bagels, rope or poke-a-hole. I prefer the ‘poke-a-hole” method because I’m all about simple, but you can use whichever method you like best! Both methods work perfectly and the bagels turn out amazing either way!
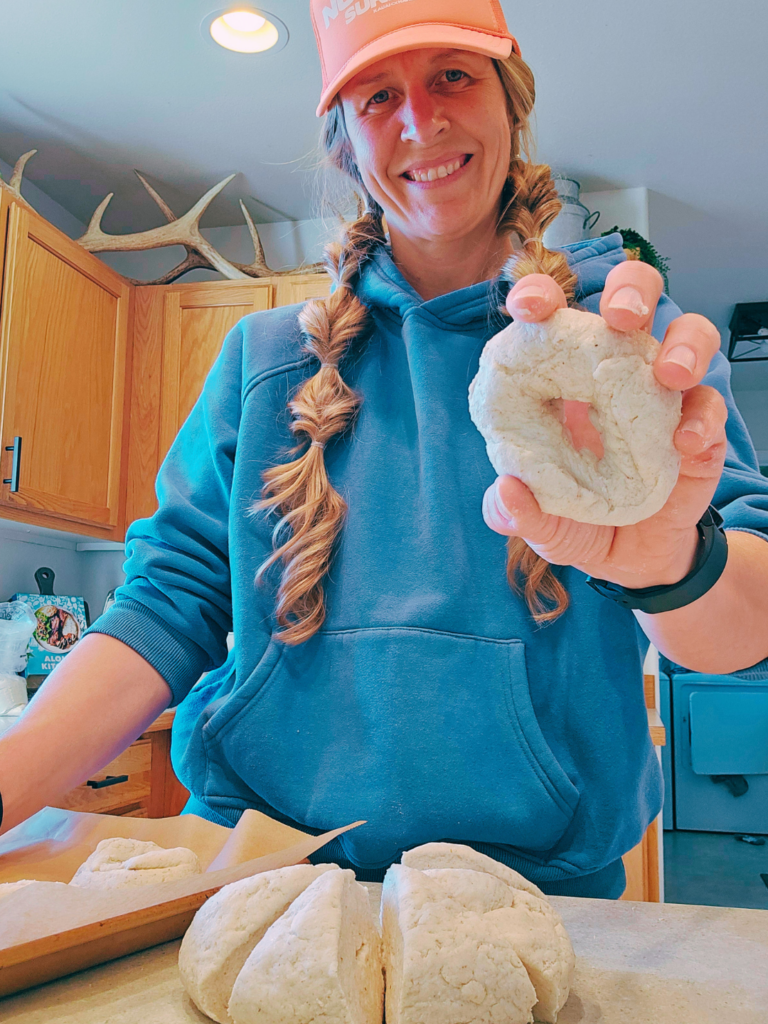
- The “poke-a-hole” method: you shape a portion of the dough into a ball in your hands, then poke your thumb or finger through the center and gradually widen the hole until you get the typical bagel shape.
- The rope method: you shape the dough into a long rope and form that into a bagel by connecting the ends to seal the rope making a circle.
Classic Bagel Size
Does anyone else get annoyed at everything gluten-free being way smaller just because it’s gluten-free? Well, I was determined to make these bagels a normal, wheat-filled bagel size. So after lots of testing, I got these delicious, chewy bagels to be about 5 inches across which make the perfect sandwiches. However, you can make them smaller or larger when shaping, if you want.
Ways to Serve Them
We are constantly making these bagels, plus they’re perfect for meal prep and freezing. They make busy school mornings way smoother and some ways we love serving these bagels are:
- Breakfast sandwiches: Scrambled/fried egg, bacon or sausage, and cheddar cheese.
- Lunch/Dinner sandwiches: Chicken salad, tuna salad, or turkey and cheese.
- Pizza Bagels: Top with marinara, mozzarella, and pepperoni, then bake.
- Egg in a Hole: Cut out the center (or use the hole) to cook an egg inside
- Cream cheese or dairy-free cream cheese
- Butter, jam, peanut butter
- Avocado and eggs
- Smoked salmon

How long do these gluten free bagels last?
Bagels are at their very best on the day of baking. However, these bagels keep really well for 3-5 days in a sealed container. I love to toast them sliced in half in a regular toaster before serving and it helps crisp up the crust and returns the crumb to it’s ultimate chewy softness.
I also like to freeze these bagels by wrapping each in plastic wrap and storing in a freezer safe Ziploc bag. When I want a bagel, I just thaw on the counter or microwave it for about 20 seconds, cut it in half, and toast it.
Either way, these bagels are insanely delicious and I know they’ll become a regular staple you keep on hand in your kitchen. Enjoy!
More Gluten-Free Bread Recipes You’ll Love:
If you’re looking for more amazing gluten-free bread recipes, you’re definitely in the right place, even the non-allergy people love these!
- Gluten-Free Sourdough (learn every simple step)
- Nikki’s Gluten-Free and Dairy-Free Banana Bread
- Gluten-Free Sourdough Pumpkin Bread
- Gluten-Free Ooey-Gooey Cinnamon Rolls
- Homemade Everything Bagel Seasoning
Save This Recipe
Just enter your email and get it sent to your inbox! Plus you’ll get great new recipes from me!
Homemade Gluten-Free Bagels
Ingredients
- 6 tbsp whole psyllium husk
- 2 1/4 cups warm water
- 1 3/4 cups tapioca flour
- 1 1/2 cups brown rice flour
- 1/2 cup sorghum flour
- 1 1/2 tbsp granulated sugar
- 2 tsp sea salt
- 3 tsp active dry yeast
- 1 1/2 tbsp olive oil (I use avocado oil)
You'll also need:
- 2 tbsp sugar or molasses (for boiling the bagels)
- 1 egg (optional for brushing bagels after boiling)
- Everything Bagel Seasoning or white sesame seeds (optional for toppings)
Instructions
Making the dough:
- You can prepare the dough using a stand mixer or by hand.
- Activate the yeast: In a small bowl, whisk together the yeast, 1/2 cup of the warm water, and sugar. Proof until the yeast bubbles and a thin layer of foam forms on top, about 10 minutes.
- Psyllium husk: In a separate small bowl, mix together the psyllium husk and the other 1 3/4 cups of the warm water. Set aside for a couple minutes to form a gel. Once the gel forms, add the oil and whisk together well.
- In a large bowl or the bowl of a stand mixer fitted with the dough hook, combine the tapioca flour, brown rice flour, sorghum flour, and salt together. Add the psyllium husk gel and the yeast mixture mixing on medium speed for a few minutes, until the dough comes together and is smooth. Alternatively, you can mix the dough by hand in a large bowl.
- The dough should be smooth and quite firm without lumps of unmixed flour. It shouldn't be sticky.
Shaping the bagels:
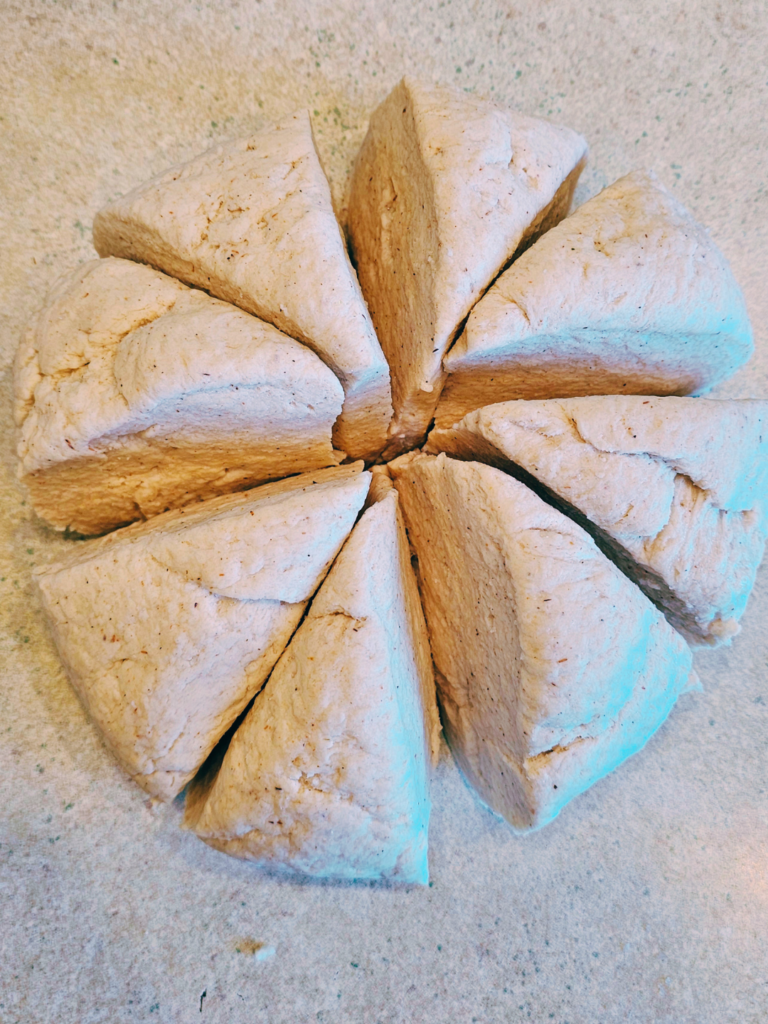
- Line a large baking sheet or two small baking sheets with parchment paper.
- Turn the dough out onto a work surface, gently knead, and shape it into a ball. Using a bench scraper or knife, cut the dough into 8 equal portions. Shape each piece into a ball, then use the end of a wooden spoon or your thumb to press a hole through the center of the dough, gently expanding it to about 1 1/2 inch diameter. Transfer the shaped bagels onto the parchment paper and repeat with all of the dough pieces.
Proofing the bagels:
- Cover the bagels with a clean kitchen towel or plastic wrap. Let the bagels proof/rest in a warm spot on the counter for about 30 minutes, until they're slightly puffed up, but not yet doubled in size.
- These bagels require a short proofing time. It's really important that you *don't* proof them until they've doubled in size or they will collapse during boiling and baking producing a tight, dense crumb.
Boiling the bagels:
- First, preheat the oven to 450F.
- Fill a large, wide pot with water and 1 tbsp sugar. Make sure the water is about 3 inches deep, so you can easily flip the bagels over. Bring the water to a boil, then reduce the heat to medium-high heat.
- Drop the proofed bagels in the water, letting 2-4 bagels boil at a time depending on your pot size. Boil the bagels about 45 seconds, then flip the bagels and boil for another 45 seconds.
- Remove the bagels from the boiling water and transfer them to the lined baking sheet. Make sure they're well spaced out on the baking sheet by at least 2 inches, as they'll expand during baking.
- Egg Wash Note: This is an optional step that I skip most of the time, either way the bagels will still be golden brown and delicious. If you DO the egg wash, brush the bagels generously right after boiling and sprinkle with toppings. If you DON'T do the egg wash, just sprinkle or roll the bagels in the toppings right after boiling while they're still a little wet. Sprinkle with Everything Bagel Seasoning, white sesame seeds, any other topping or leave them plain.
Baking the bagels:
- Reduce the oven temperature to 400F and place the bagels into the oven on the middle rack. Bake for about 30-35 minutes, until the bagels are deep golden brown.
- Once baked, transfer the bagels to a wire rack to cool completely. Don't be tempted to cut into them while they're still warm – their crumb needs some time to properly set and if you cut into them, you'll find a sticky, gummy interior.
- After the bagels have cooled completely, you can serve or store them in an airtight container at room temperature. cut bagel in half and toast in a regular toast.
- When ready to serve, I like to toast the bagels cut in half in a regular toaster. It crisps the crust and keeps the crumb soft and chewy.
Notes
This post may contain affiliate links. Please read our disclosure policy.

These are amazing!!!!
John, thanks so much! I’m so glad you loved these bagels! Our household is obsessed with them.
These look great. Would you happen to have weight (metric) measurements of ingredients as opposed to imperial measurements?
Sorry, I do not. I don’t use a scale as I find it easier. I hope you enjoy these yummy bagels!
Should the rice flour be the extra fine grind? Or is Bob’s Red Mill ok to use?
Yes, I use ground rice flour so it’s not so gritty. =) Enjoy!
These are amazing! Everything I’ve been missing since being diagnosed with celiac disease!
YAY!! This makes me so happy to hear!! It’s hard for me to not eat every.single.one! =)